Friday, December 30, 2011
Merry Christmas and Happy New Year
Wishing you and yours a very safe holiday season. New posts will start again after New Years. Until then Enjoy and Be SAFE.
Thursday, December 15, 2011
My Favorite Tea Even For Winter Parties
I just love fruit tea, such a great change to a typical tea recipe and really is perfect for parties.
 3 Reviews http://www.food.com/recipe/fruit-tea-163369
Fruit Tea
By CaramelPie on April 07, 2006
3 Reviews 
- Prep Time: 10 mins
- Total Time: 10 mins
- Serves: 8-12, Yield: 1.0 gallon
Ingredients
- 6 -8 cups water
- 3 large tea bags
- 1 cup sugar
- 6 ounces frozen lemonade concentrate
- 12 ounces frozen orange juice concentrate
- 46 ounces pineapple juice
Directions
- Boil water, pour over tea bags, and steep for 5 minutes.
- Add other ingredients plus enough water to make 1 gallon.
- Stir and serve.
Tuesday, December 13, 2011
Homemade Relaxation ...Bath Fizzies
Tools and Materials
- Baking soda
- Cornstarch
- Citric acid
- Spritzer bottles
- Food coloring
- Glass bowl
- Essential oil
- Baking molds
Bath Fizzies How-To1. Sift 1 3/4 cup baking soda, 1 cup citric acid, and 2 cups cornstarch through a sieve to remove chunks. To make different tints, fill small spritzer bottles with water and add about 6 drops of food coloring to each.
2. Pour 1 cup of powdered mixture into a glass bowl. Lightly spritz, stirring after each spritz, until powder is desired color. Add water slowly, so mixture does not fizz. If mixing two tints, alternate colors as you spritz. Check the consistency of powder with your fingers; when it can be tightly packed or shaped, stop spritzing (this may take a little while).3. Select an essential oil. Add 5 drops if it's one of the stronger scents (peppermint, lavender), 6 if it's a weaker one (lemon, grapefruit). Mix well. Firmly pack mixture into small baking molds. We used 1/4 cup for each fizzy, which is good for one bath. Allow mixture to set for 2 hours, then pop out carefully. Repeat with different tints for remaining powder.

http://www.marthastewart.com/280275/how-to-make-bath-fizzies?backto=true&backtourl=/photogallery/bath-and-spa-gifts
Monday, December 12, 2011
Like Candles, Need Candles, Gifts? Check this out!
No mess candle making in a crock pot, extremely easy!
http://bonzaiaphrodite.com/2009/12/homemade-holidays-crock-pot-candles/
http://bonzaiaphrodite.com/2009/12/homemade-holidays-crock-pot-candles/
Friday, December 9, 2011
Need A Cheap Lunch Date Option? BOGO Whopper At Burger King This Weekend Only!
Go to a participating BK and BOGO Whopper! Cheap date!
https://www.facebook.com/burgerking?sk=app_300220516667903
https://www.facebook.com/burgerking?sk=app_300220516667903
Do You Buy Diapers?
If you buy Huggies and don't mind a Santa theme on the diapers...go check this deal out. $5!!!! I just bought ten total...steal of a deal if you go pick them up.
http://www.facebook.com/l.php?u=http%3A%2F%2Fwww.freebieshark.com%2F2011%2F12%2Ftoysrus-com-huggies-santa-diapers-only-5-00.html&h=6AQHOqMPRAQE-Ylq5EwhvS5NSCqwDmsu-F1fEOwOYg5XoCA
http://www.facebook.com/l.php?u=http%3A%2F%2Fwww.freebieshark.com%2F2011%2F12%2Ftoysrus-com-huggies-santa-diapers-only-5-00.html&h=6AQHOqMPRAQE-Ylq5EwhvS5NSCqwDmsu-F1fEOwOYg5XoCA
Thursday, December 8, 2011
DIY Shavecream
I saw this on Pinterest and thought it was definitely worth sharing. I would say modify the ingredients depending on skin type ( ex. sensitive ) if you need to.

Ingredients:
credit: http://jandjnewleaf.blogspot.com/2011/08/homemade-beauty-shave-cream.html

Ingredients:
- 1 cup conditioner
- 1 cup shampoo
- 5 tablespoons baby oil
- 5 tablespoons hand cream
- Use a large bottle or some other large storage container to store the shave cream. Pour in conditioner first, then shampoo.
- Add baby oil; then hand cream.
- Secure the container and shake. Let mixture sit for about an hour.
credit: http://jandjnewleaf.blogspot.com/2011/08/homemade-beauty-shave-cream.html
Wednesday, December 7, 2011
Another Baby Item On A Budget
Did you know that baby powder is basically just corn starch (pure)? Well, it is.... a couple varieties add some aloe and a vitamin to it. So, if you have an empty baby powder bottle fill it up with some pure corn starch. If you don't have a empty one use a salt/pepper shaker to get it on your child's delicate "B-Hind." If you do opt to use a salt/pepper shaker, please make sure it is washed out completely to avoid any irritants.
Enjoy!
Enjoy!
Tuesday, December 6, 2011
North Pole Letters From Santa To Your Children
Want a letter from Santa to your little one? Check this out but the deadline is Dec 10th.
http://about.usps.com/news/state-releases/ak/2011/ak_2011_1108.htm
http://about.usps.com/news/state-releases/ak/2011/ak_2011_1108.htm
$5 O'Charleys Burger Day, Today Only
Ocharleys has a coupon good for today only, it is a coupon that was given on their FB page. Go here to print:
https://www.facebook.com/profile.php?id=10600435#!/photo.php?fbid=283653325005944&set=a.179294848775126.30670.157524280952183&type=1&theater
or
https://www.facebook.com/profile.php?id=10600435#!/ocharleysfans
https://www.facebook.com/profile.php?id=10600435#!/photo.php?fbid=283653325005944&set=a.179294848775126.30670.157524280952183&type=1&theater
or
https://www.facebook.com/profile.php?id=10600435#!/ocharleysfans
Monday, December 5, 2011
If You Are A Parent, This Is A Recipe You Can't Afford To Skip!
When my 6 year old was spending most of her first year at Vanderbilt Hospital, we had a diaper rash occur while there and WOW did the nurses give us a recipe that should never be lost! Well, we lost it, and it took my sweet niece being here for a visit to find the recipe again courtesy of our pediatrician. YAY! Even if you are not a parent, I am sure you know someone who is that could use this. I have in the past made a recipe card and bought all the ingredients for a new mom for a shower gift. Now, I have a word of CAUTION!, there are recipes out there that claim to be this recipe, but they are not. Some of the ingredients that were given to us (and stressed to be the exact ones) are not the ones that are being published by other blogs or posts. Please make sure to follow exactly, it is very important the right ingredients get used.
As always, it is important to ask your doctor if it is ok to use any product or medicine on a child.......
So here it is!!!!
HAPPY HINEY DIAPER RASH CREAM!
mix all ingredients thoroughly in equal parts in an airtight container
1 Tbsp. of Aquaphor or Butt Paste (generic is fine just make sure the same ingredients)
1 Tbsp. of Monistat (generic is fine)
1 Tbsp. of 1% Hydrocortisone ointment (not cream)
1 Tbsp. of original (not mint) Maalox
Use with each diaper change until diaper rash is gone. Important message from me, Do Not dip your finger in the container each swipe you put on your child....you are contaminating the jar. My advice is to use a sterile popsicle stick or something similar to put to your hand and then your hand to your child's skin.
I hope that this helps each mother when the dreaded diaper rash appears.
Friday, December 2, 2011
No BPA Items
So, I was at the Dr. doing the usual maternity check-up and a new warning from my Dr came up (even though it was not a new topic to me). She told me that I and my family needed to throw out and steer clear of any items that were not BPA free. She informed me that it was linked to several things in small children (adults not mentioned) and should be avoided completely.
With this said....I figured I would help you to purchase items for your child that are BPA free.
Baby Bottles and more: http://www.newbornfree.com/
For your toddler eating: http://www.greentoys.com/greeneats/index.html
Food Storage: http://www.glad.com/faqs/
General search website: http://www.vitacost.com/bpa-free?csrc=PPCYB-bpa%20free%20products&mtp=eXCtRnVha|pcrid|837480609|mt|e
Buy USA Made!
This is so important in this day and time. Having a problem finding items made in the USA? Well, hopefully this will help through these websites:
http://abcnews.go.com/Business/MadeInAmerica/made-america-gift-ideas/story?id=15041794
This is a great website to search by product type http://americansworking.com/
http://madeinusaforever.com/
Here is TAP website:
http://tapamerica.org/get-involved/become-a-member/?gclid=CLnmt8TO46wCFdKR7QodZj7XIw
Wednesday, November 30, 2011
A WARNING Post for Parents....Please read.
I think this affirms why we need to do more ourselves. I will be breaking out my juicer.
http://news.consumerreports.org/safety/2011/11/consumer-reports-tests-juices-for-arsenic-and-lead.html
http://news.consumerreports.org/safety/2011/11/consumer-reports-tests-juices-for-arsenic-and-lead.html
Remember Making Salt Dough Ornaments in School?
I remember making these ornaments in school, and they were so fun! My mother still has the ornaments we made, and she still hangs them on the tree. What a great thing to keep and collect to pass on later to your child. I think I am going to make two of each child's ornaments. This way I can keep one forever and can pass one along to them when old enough.
4 cups of flour
1 cup salt
Food coloring
Large Mixing Bowl
Water to moisten
cookie sheet
just a tad of oil
a small rolling pin or wooden dowel
a drinking straw
ribbon
a plate for a guide
paint *if desired
*My goal for this batch was to do a handprint with both twins' hands on one keepsake & then to have a separate one for each.* This recipe had enough to make 3 keepsakes. Depending on the size & how many kids you have, you may need to double the recipe.*
 In your mixing bowl ~ gradually blend in your flour & salt with water.
  It was easier for me to lightly grease my baking sheet with oil & form & roll out on the cookie sheet. Once you have your form made, I suggest you use your straw to make a whole in it before you have your kids emboss their hand print.
  Keep in mind you need to have your dough thick enough to form the handprint. If your dough is too thin, it will not work. Place in a 150* degree oven for an hour. Or you can air dry over night & for 24 hours.
Credit: http://www.bystephanielynn.com/2010/11/salt-dough-hand-print-ornament-by.html
4 cups of flour
1 cup salt
Food coloring
Large Mixing Bowl
Water to moisten
cookie sheet
just a tad of oil
a small rolling pin or wooden dowel
a drinking straw
ribbon
a plate for a guide
paint *if desired
*My goal for this batch was to do a handprint with both twins' hands on one keepsake & then to have a separate one for each.* This recipe had enough to make 3 keepsakes. Depending on the size & how many kids you have, you may need to double the recipe.*
 In your mixing bowl ~ gradually blend in your flour & salt with water.
 *Remember to add gradually, because you can always add more water then takeaway.*
It was easier for me to lightly grease my baking sheet with oil & form & roll out on the cookie sheet. Once you have your form made, I suggest you use your straw to make a whole in it before you have your kids emboss their hand print.  Keep in mind you need to have your dough thick enough to form the handprint. If your dough is too thin, it will not work. Place in a 150* degree oven for an hour. Or you can air dry over night & for 24 hours.
Credit: http://www.bystephanielynn.com/2010/11/salt-dough-hand-print-ornament-by.html
Tuesday, November 29, 2011
Are You A "Follower" of This Blog?
I really enjoy sharing great ideas, recipes, money savings tips, and so much more. With that said, I would like to have some feedback from people who are viewing and/or using this blog.
So....please join as a "Friend" or "Follower" and let me know what you think about it. Please feel free to drop a comment below any of the posts.
Thank you everybody and Enjoy!
So....please join as a "Friend" or "Follower" and let me know what you think about it. Please feel free to drop a comment below any of the posts.
Thank you everybody and Enjoy!
Crock Pot Meal That's Super Tasty!
With the morning sickness that seems to fall afternoon and night, my dinners have become quite puny :) So, I found a Crock Pot meal that I tweaked, and it was absolutely delicious! So, here is it:
Ingredients:
1 can of Campbell's Cream of Mushroom Soup
1 can of Campbell's French Onion Soup
4 chicken breasts
1 envelope of Italian Seasoning/Dressing Mix
1 1/2 cups of white cooking wine
1 Tbsp. of chives
1 8oz. package of cream cheese
Egg noodles or Rice
Directions:
In your Crock Pot put your two soup mixes and stir/blend well. Then, add your Italian dressing mix and mix/blend well. Next, add your chicken breasts, chives, and white wine. Cook on high for 4 hours or low for 7-8 hours. Thirty minutes before serving, add the cream cheese (cut into chunks so it melts easier) and stir until it is completely melted. Finally, serve over egg noodles or rice (whichever you prefer) and ....
Enjoy!
Friday, November 25, 2011
Check This Out! Body Butter Bars!
Body Butter Bars
You'll Need
Mold (I used a silicone cupcake tin)
Double boiler of some sort
Shea Butter
Coconut Oil
Beeswax
1) Determine how much weight your mold can hold. I did this by placing my mold on my kitchen scale, hitting tare, and pour water in to the desired fullness. If you're using something like a cupcake tin, or something with multiple cavities you can just fill one and then multiply by the number of cavities. My cavities held 2 oz of water, so I needed a total of 24 oz of oils.


**NOTE: When buying beeswax, it's probably better to buy the pastilles or 1 oz blocks. I bought the 1 lb blocks because they were cheaper (I regret that decision). It took me 10 minutes to figure out how I was going to break down that block of beeswax. I ended up just breaking it into pieces with a hammer.**
3) Melt oils. You can do this step however you feel comfortable. Options include in the microwave, crockpot or using some sort of double boiler. My double boiler was actually a steaming pot that I set a 4 cup, glass Pyrex measuring cup in (it made for easy pouring).

I did find that the oils melted faster if I put the lid on. Also the beeswax takes the longest to melt so you might want to put that on the bottom.


4) Pour melted oil into mold.

5) Put mold in freezer. My bars were completely cooled in 33 minutes. (I know because that's exactly how long I was exercising)

6) Remove from mold and enjoy! After taking my bars out the mold, I wrapped the ones I didn't intend to use right away in wax paper and put them in the freezer.
Check her blog out/Credit: http://ourgreenexperiments.blogspot.com/2011/03/making-body-butter-bars.html
Wednesday, November 23, 2011
Happy Thanksgiving and Safe Travels Everyone
I would like to send out a heart felt Happy Thanksgiving message to each and everyone. May you spend it with the ones you love, enjoy the time off, and be thankful for all we have. Please travel safely and see you on Monday.
Enjoy!
Enjoy!
Tuesday, November 22, 2011
Thanksgiving Wine Bottle Labels and More
Plan on joining a party for Thanksgiving and will be bringing a bottle of wine? Well, dress up the bottle and make it more personal for FREE. Enjoy!
http://www.bhg.com/thanksgiving/crafts/free-fall-thanksgiving-wine-labels/
http://www.bhg.com/thanksgiving/crafts/free-fall-thanksgiving-wine-labels/
Monday, November 21, 2011
Scents of The Season
There is nothing better than walking around in your home and smelling Christmas all around you. So, I have found several recipes for simmering potpourri for your home to do for yourself or as gifts. Enjoy!
Fruity-Fresh Simmering Potpourri
Christmas-y Simmering Potpourri
Credit: http://www.curbly.com/users/diy-maven/posts/2588-easy-homemade-simmering-potpourri-recipes
Spicy Simmering Potpourri
- 1 oz. can cinnamon sticks, broken into small pieces
- 1 (1.12 oz.) can whole cloves
- 1 (1.25 oz.) can whole allspice
Fruity-Fresh Simmering Potpourri
- 1 lemon
- 1 orange
- 3-3 inch cinnamon sticks
- 6 bay leaves
- ½ cup whole cloves
Christmas-y Simmering Potpourri
- 3 cinnamon sticks
- 3 bay leaves
- 1/4 cup whole cloves
- 1 teaspoon ground cloves
- 2 tablespoons dried lemon peel
- 2 tablespoons dried orange peel
- ½ teaspoon ground nutmeg
Credit: http://www.curbly.com/users/diy-maven/posts/2588-easy-homemade-simmering-potpourri-recipes
Edible Simmering Potpourri
Apple cider to fill a large soup pot
One apple, cut horizontally to make circular round slices 1/2-inch thick
One orange, cut into round slices 1/2-inch thick
3 whole cinnamon sticks
6 whole cloves
6 whole allspice berries
One 2-inch piece of fresh gingerroot, cut into small rounds Place all ingredients in a large soup pot and bring to a simmer, then reduce and allow to simmer uncovered, adding cider as liquid evaporates.
When guests arrive, ladle out a mug full of the hot cider for each person, adding a splash of bourbon or brandy, if you like, and serve with an additional cinnamon stick in each mug.
3 bay leaves
1/4 cup whole cloves
1 teaspoon ground cloves
2 lemon slices, fresh or 2 tablespoonsdried lemon peel
2 tablespoons orange peel or dried orange peel
1/2 teaspoon ground nutmeg
1 quart water
Apple cider to fill a large soup pot
One apple, cut horizontally to make circular round slices 1/2-inch thick
One orange, cut into round slices 1/2-inch thick
3 whole cinnamon sticks
6 whole cloves
6 whole allspice berries
One 2-inch piece of fresh gingerroot, cut into small rounds Place all ingredients in a large soup pot and bring to a simmer, then reduce and allow to simmer uncovered, adding cider as liquid evaporates.
When guests arrive, ladle out a mug full of the hot cider for each person, adding a splash of bourbon or brandy, if you like, and serve with an additional cinnamon stick in each mug.
Christmas Simmering potpourri
Simple and great smelling. I like to mix the dry ingredients up in little Ziploc's to have them ready to add to water during the holiday season.
3 cinnamon sticksSimple and great smelling. I like to mix the dry ingredients up in little Ziploc's to have them ready to add to water during the holiday season.
3 bay leaves
1/4 cup whole cloves
1 teaspoon ground cloves
2 lemon slices, fresh or 2 tablespoonsdried lemon peel
2 tablespoons orange peel or dried orange peel
1/2 teaspoon ground nutmeg
1 quart water
Mix all ingredients in medium saucepan. Simmer on low heat. Add more water as needed.
Spicy Simmering potpourri
* 3 1/2 cups anise star, whole
* 1 3/4 cups allspice, whole
* 1 3/4 cups orange peel
* 1 3/4 cups juniper berries
* 1 3/4 cups nutmeg, whole
* 1 3/4 cups cloves, whole
* 3 1/2 cups cinnamon chips
* 1 3/4 cups lemon peel
* 3 1/2 cups rosehips
* 3 handfuls bay leaves, whole
Use oil fragrances such as French vanilla, old world spice, and vanilla fragrance. This recipe makes 24 cups.
Citrus Simmering potpourri
* 1 cup cinnamon sticks, whole, 1"
* 1 cup orange petals, whole
* 1/4 cup lemon or grapefruit peel
* 1/8 cup allspice, whole
* 3 cups lemon verbena leaves, whole
* 1 cup chrysanthemum flowers, whole
* 1 3/4 cups orange peel, cut and sifted, 1/2" - 3/4"
* 1/8 cup cloves, whole
* 2 cups lemongrass 1/2" cut
For oil use 1/8 ounce lemon essential oil, 1/2 ounce sweet orange essential oil, 1/8 ounce tangerine essential oil, and 1/8 ounce cinnamon bark essential oil. This recipe makes 12 1/2 cups.
Floral Simmering potpourri
* 1 cup rosebuds and petals, pink
* 1 cup rosebuds and petals, red
* 1 cup Balm of Gilead buds, whole
* 1 1/2 cups orange peel, cut and sifter, 1/2" - 3/4"
* 16 nutmegs, whole, cracked with a hammer
* 1 cup oak moss
* 1/4 cup allspice, whole
* 2 cups cinnamon chips
* 1 vanilla bean, cut into small pieces
* 1/4 cup fenugreek seeds, whole
* 1/4 cup cloves, whole
Use 3/4 ounce of your favorite floral fragrance oil. This recipe makes 8 1/2 cups.
Fruity Simmering potpourri
* 1 1/2 cups orange peels, cut and sifted, 1/2" - 3/4"
* 1 cup anise star, whole
* 1/4 cup cardamom pods
* 2 cups cinnamon chips
* 1 cup apple pieces
* 1/2 cup mace, whole
* 1/4 cup allspice, whole
* 1/4 cup cloves, whole
For oil, use 1/2 ounce apple fragrance, 1/8 ounce cinnamon bark essential oil OR use 3/4 ounce spicy apple fragrance. This recipe makes 6 3/4 cups.
Wednesday, November 16, 2011
Several Postings Today
I have posted several postings today, because I am not sure if I will be able to post tomorrow....but come by and check to make sure.
From Scratch, Moisty Yellow Cake Mix....YUM!
I was sent this website, and I have to say I am extremely glad I received it. I shall share with you :)
Tuesday, November 11, 2008
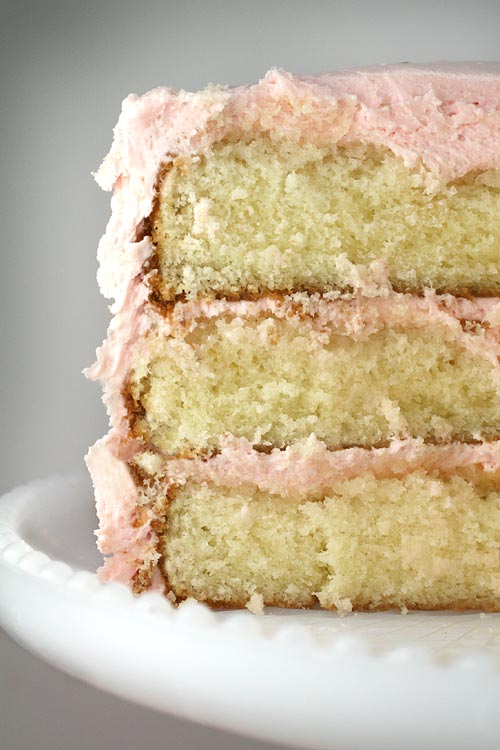
A moist yellow cake recipe. (Actually, I asked for it.) I have been on the hunt for a moist yellow scratch cake recipe since I started this site. I’ve tried several in the past, like the Butter Cake recipe from The Cake Bible (a great baking resource, by the way). And, while the taste was really good, I’ve been having a time trying to get the recipe to come out as moist as I like. I finally came to the conclusion that it must be my gas oven that’s the problem. At least, that’s what I’ve been telling myself.
So, the hunt was on. It was a short search that began and ended with my friend’s mom. She used to own a bakery and made the yummiest cakes. So, I thought I would ask the pro for help. And, I’m so glad I did. It was yellow and moist, but mostly delicious. Thanks for the recipe, Shirley! I guess I’ll have to come up with another reason to trade my gas oven in for an electric one. Here’s the recipe:
Moist Yellow Cake
1 cup (2 sticks) of butter (room temperature)
2 cups of sugar
4 eggs (room temperature)
3 cups of sifted self-rising flour (White Lily)
1 cup of whole milk (room temperature)
1 teaspoon pure vanilla extract (McCormicks)
1/2 teaspoon butter flavoring
Cake assembly:
1 teaspoon pure vanilla extract
1 1b. 10X powdered sugar
1-3 teaspoons milk, half and half or cream

P.S. I’ve been using aluminum cake pans instead of the dark coated kinds you find in the grocery store. They also come in many different sizes.
http://www.bakerella.com/finally-i-found-it/
Tuesday, November 11, 2008
Finally, I found it!
A moist yellow cake recipe. (Actually, I asked for it.) I have been on the hunt for a moist yellow scratch cake recipe since I started this site. I’ve tried several in the past, like the Butter Cake recipe from The Cake Bible
(a great baking resource, by the way). And, while the taste was really good, I’ve been having a time trying to get the recipe to come out as moist as I like. I finally came to the conclusion that it must be my gas oven that’s the problem. At least, that’s what I’ve been telling myself.So, the hunt was on. It was a short search that began and ended with my friend’s mom. She used to own a bakery and made the yummiest cakes. So, I thought I would ask the pro for help. And, I’m so glad I did. It was yellow and moist, but mostly delicious. Thanks for the recipe, Shirley! I guess I’ll have to come up with another reason to trade my gas oven in for an electric one. Here’s the recipe:
Moist Yellow Cake
1 cup (2 sticks) of butter (room temperature)
2 cups of sugar
4 eggs (room temperature)
3 cups of sifted self-rising flour (White Lily)
1 cup of whole milk (room temperature)
1 teaspoon pure vanilla extract (McCormicks)
1/2 teaspoon butter flavoring
- Preheat oven to 350 degrees.
- Grease and flour (3) 8 inch cake pans.
- Using a mixer, cream butter until fluffy.
- Add sugar and continue to cream for about 7 minutes.
- Add eggs one at a time. Beat well after each egg is added.
- Add flour and milk (alternating to creamed mixture), beginning and ending with flour.
- Add vanilla and butter flavoring to mix; until just mixed.
- Divide batter equally into three cake pans.
- Hold each layer about 3 inches above your counter and carefully drop the pans flat onto counter several times to ensure release of any air bubbles. This will help you have a more level cake.
- Bake for 25 – 30 minutes (depending on your oven) until done.
- Cool in pans for 5 – 10 minutes.
- Remove and immediately wrap each layer in plastic wrap to seal in moisture. Cool completely on wire racks.
- Once cooled, you are ready to assemble your cake.
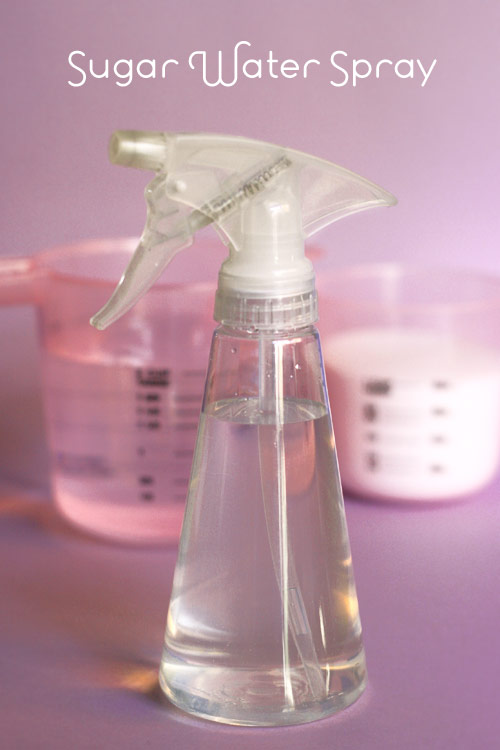
- Combine 1 cup of sugar and 2 cups of water.
- Bring to boil and boil for approximately 3 minutes. Let cool.
- Pour liquid into a spray bottle or pouring bottle.
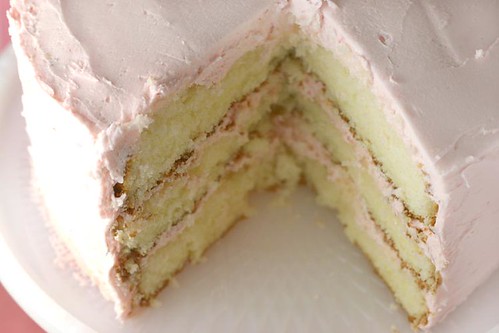
Cake assembly:
- Unwrap first layer and using a serrated knife, level off the top of your cake.
- Place layer onto your dish. Take a straw and poke holes into the layer. Using your spray bottle, spray top of layer several times; enough to give it a little moisture. Be careful – don’t add too much.
- Add a layer of frosting to your bottom layer. Repeat on second and third layers.
- Frost the sides.
1 teaspoon pure vanilla extract
1 1b. 10X powdered sugar
1-3 teaspoons milk, half and half or cream
- Using a mixer, cream softened butter and vanilla until smooth.
- Add sugar gradually, allowing butter and sugar to cream together before adding more.
- If you want your frosting a little creamier, add a teaspoon of milk at a time and beat on high until you get the right texture.
- Then, just use icing colors
P.S. I’ve been using aluminum cake pans
instead of the dark coated kinds you find in the grocery store. They also come in many different sizes.http://www.bakerella.com/finally-i-found-it/
A Very Unique Appetizer or Snack
Ok, I will warn you if you have not had these before this will seem very strange, but if you have had them you know how wonderful they are. Don't shrug it off, because kids love them!
Ham and Dill Pickle Appetizer Bites
dill pickles
thin deli ham slices or corned beef or just experiment with your favorite meat
cream cheese
"Let the cream cheese sit at room temperature for at least 30 minutes before you make these.
Cut dill pickles lengthwise into fourths or sixths, depending on how thick the pickles are. You need as many cut pickle spears as you have ham slices.
Spread each slice of ham with a very thin layer of cream cheese. (I used about 1 tsp. cream cheese on each ham slice. The ham doesn't need to be completely covered with cream cheese.)
Put a dill pickle on the edge of each ham slice and trim the ham if it's very much bigger than the dill pickle spear. Roll up the ham around the dill pickle, then place toothpicks where you want each piece to be cut. Cut into pieces so that each piece has a toothpick. Arrange on plate and serve."
http://www.kalynskitchen.com/2011/02/easy-recipe-for-ham-and-dill-pickle.html
Onion Soup Mix Recipe
We use it in sour cream for onion dip mix and we use it in dinner recipes. Enjoy!
Ingredients:
2/3 cup minced onion
3 teaspoons parsley flakes
2 teaspoons onion powder
2 teaspoons turmeric
1 teaspoon celery salt
1 teaspoon sea salt
1 teaspoon sugar
1/2 teaspoon fresh ground pepper
Directions:
Mix all ingredients together well in an air tight container or jar. Use 4 Tbsp. to equal the amount of one store bought dry package.
Tuesday, November 15, 2011
A DIY Pizza Oven!
I haven't tried this yet but will. I have copied and pasted from their website, but go to their website to see the pictures and details as well.
Enjoy!


http://www.instructables.com/id/Pizza-Margherita-and-a-5-DIY-pizza-oven/step5/The-Pizza-Oven-and-Baking/
Enjoy!


So if you have a pizza stone- great. If you don't, here's how you can make your own brick over in under $5.
You'll need either 2- 12" pieces of UNGLAZED Ceramic quarry tile or 8 pieces of 6" tiles. Again- they ABSOLUTELY HAVE TO BE UNGLAZED. I purchased mine several years ago from a very well known chain (big box) hardware store for 50 cents a piece. That's $4+ tax for the whole thing.
I'm also using a paddle because I apparently make lots of pizza. If you don't have one, use the back of a cookie sheet- you'll be fine.
We want to arrange the tile in the oven in two layers. The base layer will create the amazing crust we want, while the top will help increase the temperature within the pizza's area by creating radiant heat from the stones above. It will also aid in getting a beautiful, lightly burned top crust.
Place the stones into the oven while it is cold and bring up to the highest temperature possible... 500 Degree F is mine. I let the over preheat for about 45 minutes to get the stones very hot. Make sure your paddle is well floured to easily slide the pizza into the oven.
Bake for approximately 5-7 minutes.
http://www.instructables.com/id/Pizza-Margherita-and-a-5-DIY-pizza-oven/step5/The-Pizza-Oven-and-Baking/
Monday, November 14, 2011
Party Appetizer or For Chit Chatting Around With Guests
One of my most favorite appetizers to converse around is baked brie. Most don't realize just how simple it is.
Ingredients:
1 Round Brie (size of a saucer)
1 Package of Pillsbury Croissants
Optional-Any type of flavoring (if you like fruit then use fruit preserves etc)
Directions:
Lay out croissants still hooked together on a greased pan. Place the brie in the center of the croissants and top with your optional fruit topping. Then, fold the croissant dough up around the brie and fruit. Bake as directed on the croissant package. Serve with your favorite crackers (I suggest a wheat or mostly flavorless cracker so to get the full flavor of the brie and fruit topping).
Tip: If you have an Aldi or Sams brie right now is fairly cheap. Don't quote me but I saw brie at Aldi for $2.99 and Sams for 4 or 5.99.
Saturday, November 12, 2011
Tires, One Not To Skip!
I am told SO often about this video story that I shared via email several years ago. Please watch cause even though your tires have just been bought, they might be a driving hazard that can kill.
I can't say how happy I am that I shared this video, cause it has indeed possibly saved loved ones and friends of mine. So, please watch!
http://abcnews.go.com/GMA/video/aged-tires-driving-hazard-4826897
I can't say how happy I am that I shared this video, cause it has indeed possibly saved loved ones and friends of mine. So, please watch!
http://abcnews.go.com/GMA/video/aged-tires-driving-hazard-4826897
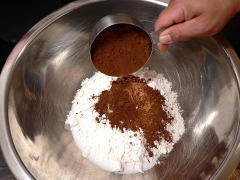
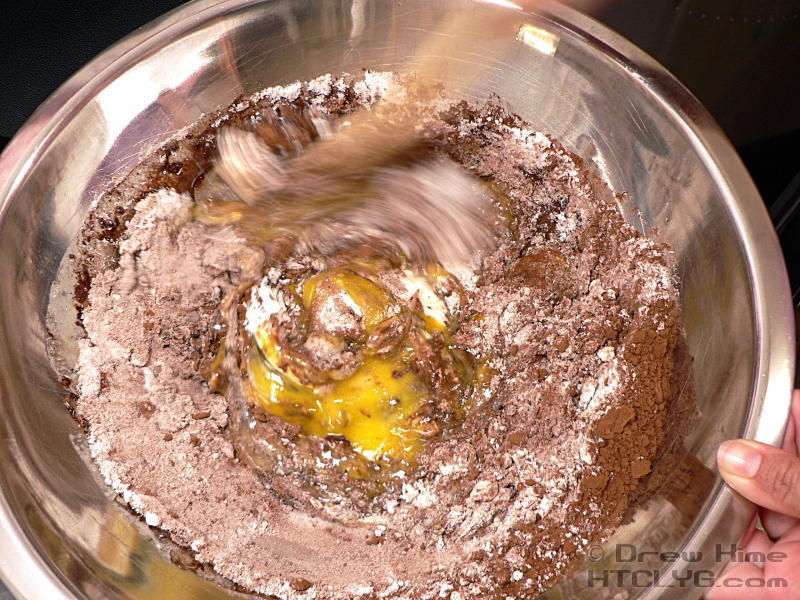
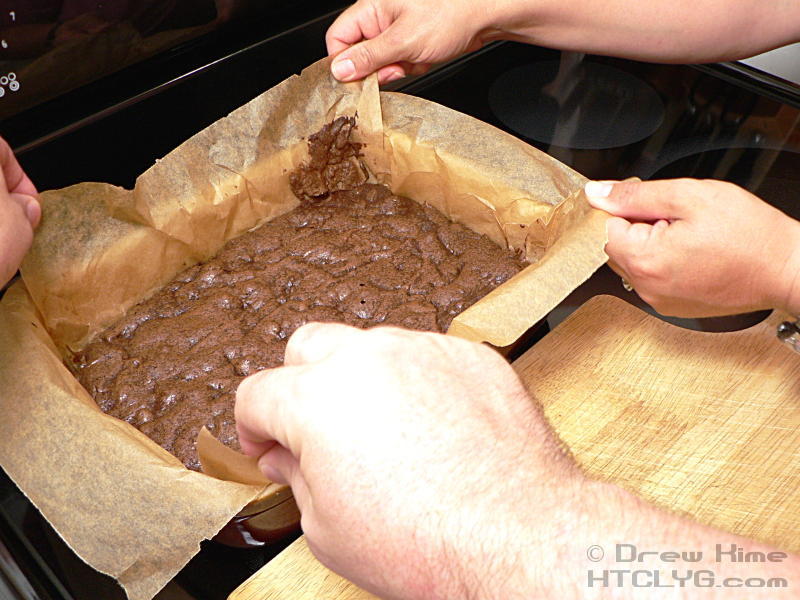
DIY Fool Proof Brownies!
I found this recipe online and thought I would share:
 1½ cups sugar
¾ cup flour
¾ cup cocoa powder (see note below)
3 eggs
¾ cup butter, melted
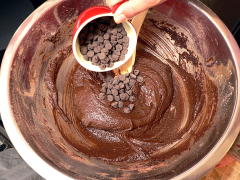
¾ cup semi-sweet chocolate chips (see note below)
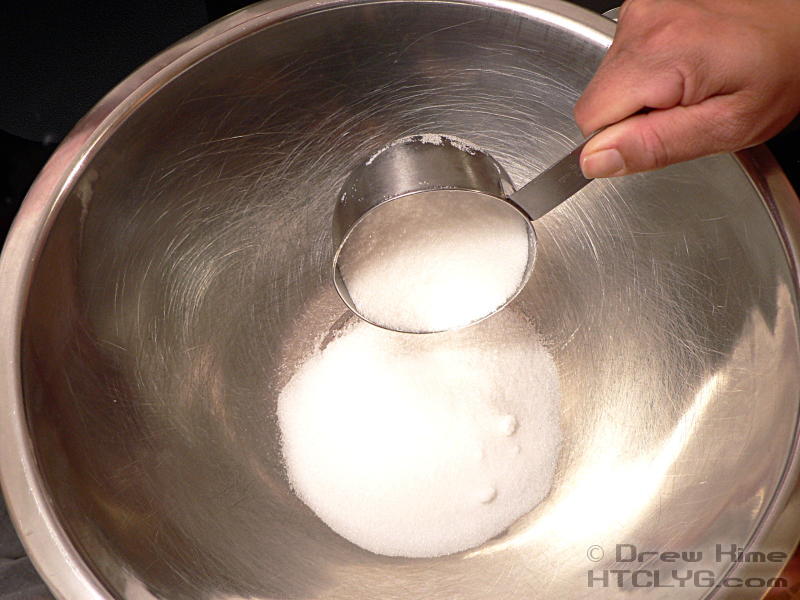
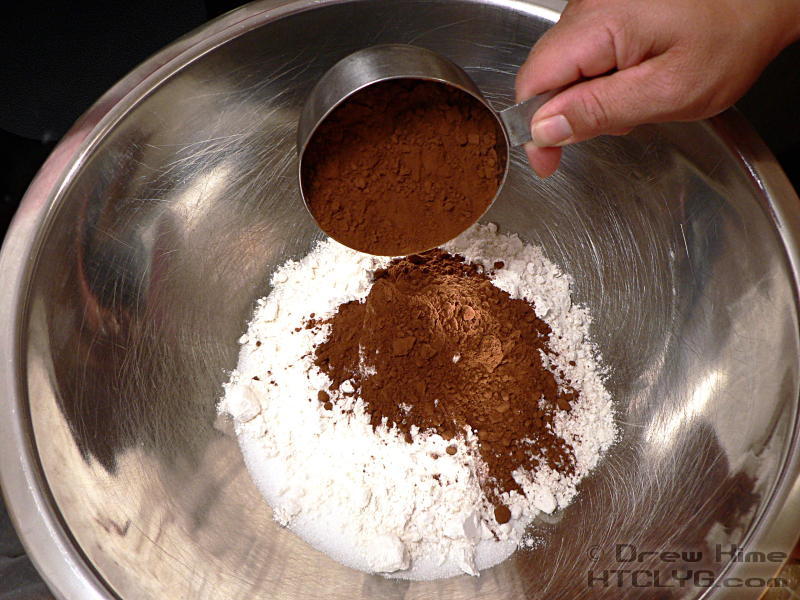
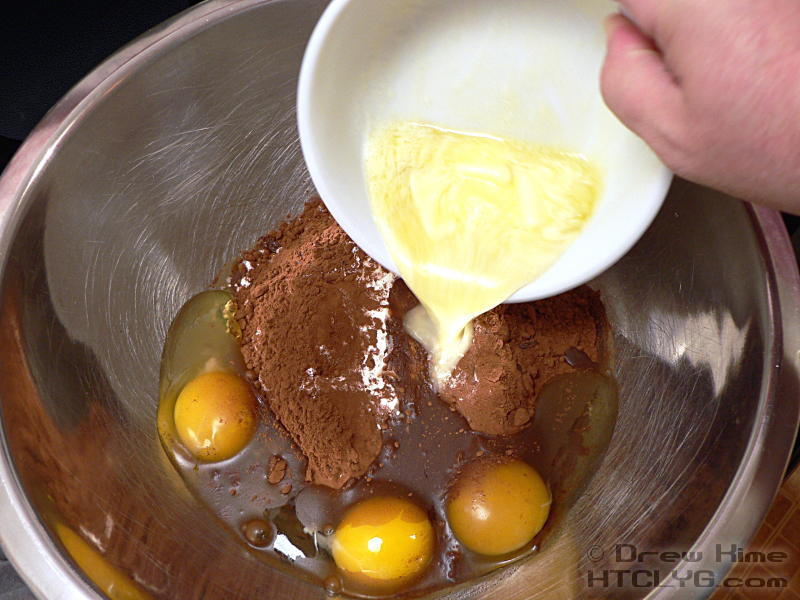
The assembly is about as easy as you can get. Combine the sugar, flour, cocoa, eggs and melted butter and mix.


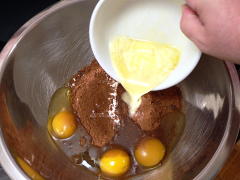

Do this by hand, until the dry ingredients are just incorporated into the wet, and stop. You don’t need to beat it, and in fact want to avoid producing gluten from the flour. (Kneading flour produces gluten, the springy protein that makes bread chewy.)
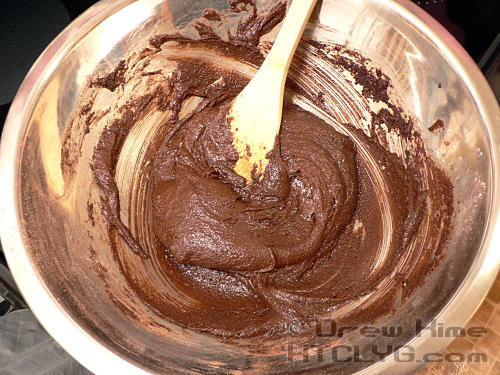
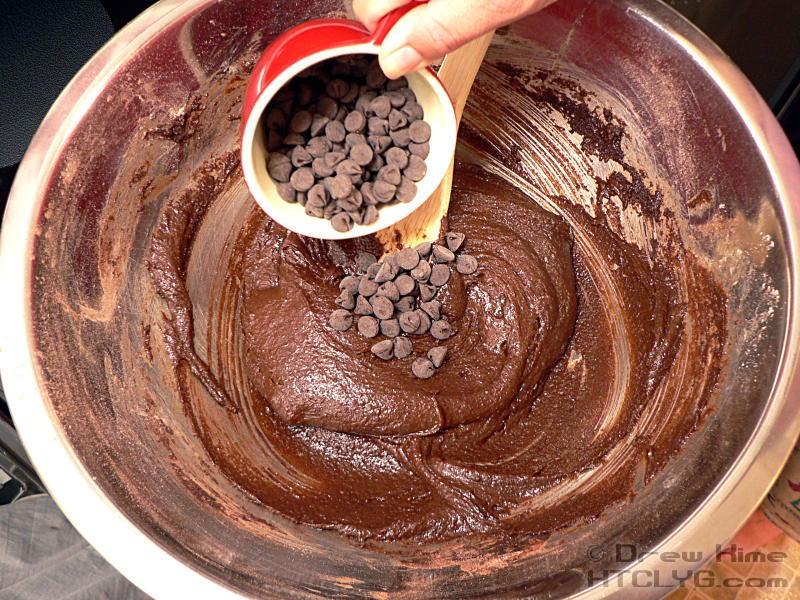
Stir in the chocolate chips.
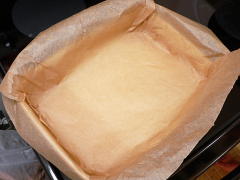
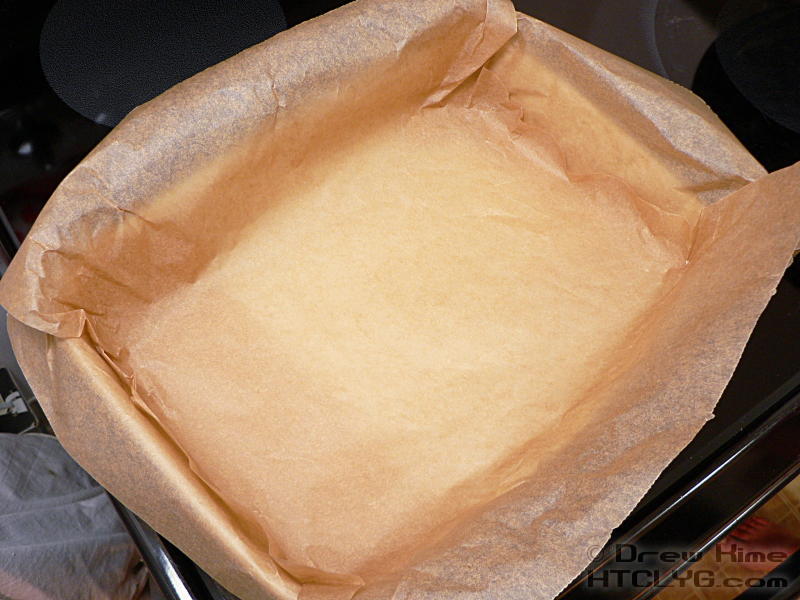
Line a 9×13 baking dish with parchment. I over-did it a little bit here, because I wanted to be absolutely sure it didn’t stick. As long as you cover the bottom you should be good, as it will pull away from the edges while baking.
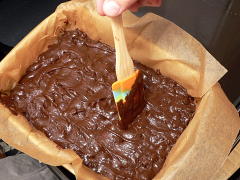
Pour the batter and spread it out. Don’t try to spread it like mayo on bread, or you’ll move the parchment around. Poke at it with the tip of a rubber spatula.
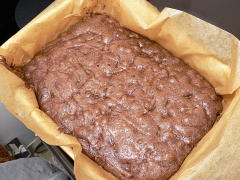
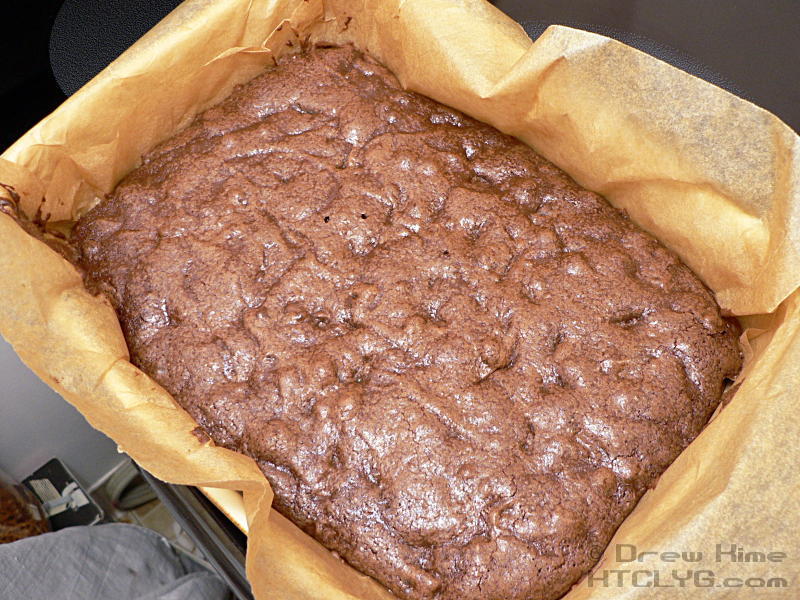
Bake at 325° for 20-30 minutes. It’s done when a toothpick inserted in the tallest part comes out clean. Keep in mind you’ve got chips in there. If you hit one with the toothpick it will have melted chocolate on it. You might need to poke a couple of spots to make sure you aren’t hitting a chip.
Very carefully lift the parchment out of the baking dish. Get a spare set of hands if you can.
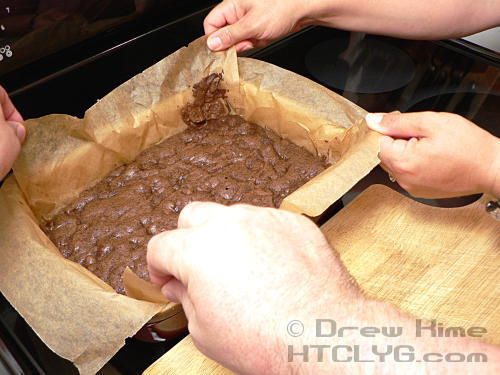
Peel the edges and let cool for a few minutes before slicing.
Credit: http://cooklikeyourgrandmother.com/2009/07/how-to-make-perfect-brownies/
Ingredients
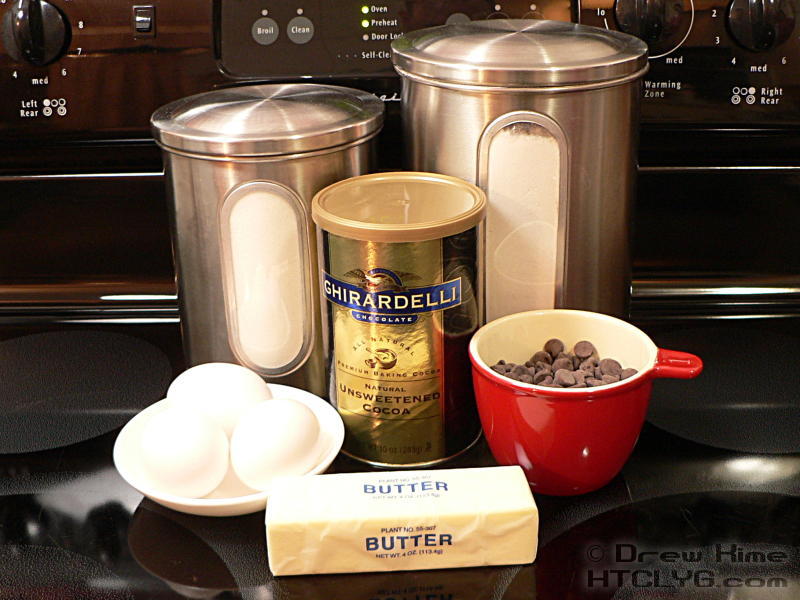 1½ cups sugar
¾ cup flour
¾ cup cocoa powder (see note below)
3 eggs
¾ cup butter, melted
¾ cup semi-sweet chocolate chips (see note below)
Directions
A NOTE ON CHOCOLATE: You’ll notice the list of ingredients is very short. That means the quality of the chocolate makes a huge difference. The chocolate flavor is front-and-center — not the sugar, not the richness, the chocolate. I used Ghirardelli unsweetened cocoa powder, and Ghirardelli semi-sweet chocolate chips.The assembly is about as easy as you can get. Combine the sugar, flour, cocoa, eggs and melted butter and mix.


Do this by hand, until the dry ingredients are just incorporated into the wet, and stop. You don’t need to beat it, and in fact want to avoid producing gluten from the flour. (Kneading flour produces gluten, the springy protein that makes bread chewy.)

Stir in the chocolate chips.
Line a 9×13 baking dish with parchment. I over-did it a little bit here, because I wanted to be absolutely sure it didn’t stick. As long as you cover the bottom you should be good, as it will pull away from the edges while baking.
Pour the batter and spread it out. Don’t try to spread it like mayo on bread, or you’ll move the parchment around. Poke at it with the tip of a rubber spatula.

Bake at 325° for 20-30 minutes. It’s done when a toothpick inserted in the tallest part comes out clean. Keep in mind you’ve got chips in there. If you hit one with the toothpick it will have melted chocolate on it. You might need to poke a couple of spots to make sure you aren’t hitting a chip.
Very carefully lift the parchment out of the baking dish. Get a spare set of hands if you can.
Peel the edges and let cool for a few minutes before slicing.
Credit: http://cooklikeyourgrandmother.com/2009/07/how-to-make-perfect-brownies/
Friday, November 11, 2011
Do You Have A Problem Organizing Receipts?
I was reading and looking through a magazine and saw a clever gift idea of a scarf on an old ribbon spool. Then I got to thinking how that would be so great to organize receipts since I am awful at this. Start a receipt by taping the top to the spool and then attach each receipt to the next and rolling it around. To secure the receipts when waiting for another one, use a rubber band to hold the receipts on the spool. This will certainly help keep my receipts organized in sections, too. I use one for gas, utilities, groceries, gifts, food, etc. Enjoy!
Thursday, November 10, 2011
Holiday Parties Coming Up Soon.
Do you so enjoy holiday parties? I know I do. With that said I thought I would put a couple holiday fruit drink ideas out there for the 21 and up crowd.
One of my favorite drinks is champagne, with a splash of pomegranate juice, with a couple pomegranate seeds dropped inside.
There are so many wonderful drinks out there to celebrate with and you can find so many of them on this blog site: http://www.drinkoftheweek.com/category/drink-of-the-week/
Check it out and maybe you can turn your usual boring drink into a new favorite drink.
Enjoy!
Wednesday, November 9, 2011
Hardwood Floor Cleaners
Why stop at the grout LOL....
Homemade Hardwood Floor Cleaner Ingredients
When your floor is ready for a thorough cleaning, you can make a homemade hardwood floor cleaner with one of the following ingredients:
• Vinegar is one of the most frequently used household items for cleaning different areas of the home. To use as a cleaner for your floor, mix ½ cup of white vinegar to one gallon of warm water. Mop with the solution and rinse your mop out frequently. There’s no need to rinse the solution once you have finished mopping since the vinegar leaves no residue behind.
• Mix together the following: 2 cups of white vinegar, 1 cup of lemon juice, ¼ cup of clear dish soap, and 2 cups water. Mop the floor with the solution and then use a soft, dry rag to wipe up any water.
• For a cleaner with a natural polish built in, mix together ¼ cup of olive oil with ¼ cup of vinegar. To give the hardwood floor cleaner a fresher smell, add several drops of essential oils. Apply to floor with a soft mop or cloth and you will have shinier hardwood floors.
• Many people believe that tea is the best ingredient to use in a hardwood floor cleaner since it brings out the grain in the wood and makes it shine. Brew up to two dozen regular sized tea bags in 2 quarts of water. Use the tea to mop your floor covering lightly but not soaking the floor. Be sure not to leave excess moisture on the wood.
• For floors that need a little more help getting rid of the dirt, mix together 1 tsp washing soda with 1 gallon of hot water. Use to gently scrub away grease, dust and dirt from your hardwood floor.
Copy and pasted/Credit: http://www.hardwoodfloorcleanerguide.com/how-to-make-a-green-homemade-hardwood-floor-cleaner/
Tuesday, November 8, 2011
DIY Grout Cleaner Recipes
Well, around here we have been cleaning grout. We bought some and well.....it didn't work very well. So, here I went searching for a DIY recipe and this is what I found:
![]() This first homemade grout cleaner is the mildest of all the recipes I've outlined here and can be used on all tile surfaces. It can also be used as a poultice to remove stains from grout and natural stone.
This first homemade grout cleaner is the mildest of all the recipes I've outlined here and can be used on all tile surfaces. It can also be used as a poultice to remove stains from grout and natural stone.
3 cups of baking soda
1 cup of water
Or 3 parts baking soda to 1 part water, amount depends area to be cleaned
Mix the baking soda into a paste and apply to the dirty grout. Let it dwell for 10 minutes and rinse clean.
1/4 cup salt
1/4 cup baking soda
1/4 cup vinegar
Mix the ingredients together in a small container and apply for cleaning floor grout. Let the solution dwell for 20 minutes. Make sure not to let the solution dry out. The solution can be scrubbed it's dwelled.
Rinse thoroughly with warm water.
![]() Recipe #3 also uses acidic vinegar and akaline ammonia, which should balence the pH, but I wouldn't count on it. Don't use on marble, limestone or travertine tile.
Recipe #3 also uses acidic vinegar and akaline ammonia, which should balence the pH, but I wouldn't count on it. Don't use on marble, limestone or travertine tile.
1/2 cup baking soda
1/3 cup ammonia
1/4 cup white vinegar
Mix the ingredients and apply the solution to your dirty grout. Let it dwell up to 20 minutes and then scrub. This solution is a bit stronger and should clean tough grout stains.
1/4 cup bleach
3/4 cup baking soda
Mix the ingredients and apply the solution to the dirty grout lines. Add water if you want do dilute the bleach.
Also, the longer you let the solution dwell, the more it will bleach the grout lines. If used on colored grout, the grout lines will start to have a faded appearance.
This is one tile and grout cleaning method (dwell) I've seen a million times when cleaning grout profesionally that really works.
lemons
baking soda
Mixing lemon juice and baking soda into a paste and appling to the dirty grout will also work. Let dwell, scrub and rinse with warm water.
1/4 cup bleach
1/4 cup alcohol
1 cup water
Mix solution and apply to grout with mildew. Keep area saturated and let dwell 20-30 minutes. The bleach will kill the mildew and the alcohol will disenfect the area. Scrub and rinse with soap and water.
Re-apply when mildew returns. In under-ventilated areas, this may need to be done a few times a month.
![]() This recipe uses the cleaning power of hydrogen peroxide. This can bleach, so don't use on colored grout. Test first on marble surfaces.
This recipe uses the cleaning power of hydrogen peroxide. This can bleach, so don't use on colored grout. Test first on marble surfaces.
3 parts baking soda
1 part Hydrogen Peroxide
Mix hydrogen peroxide and baking soda into a paste and apply to dirty grout lines.
Let dwell, scrub and rinse with warm water. This mixture works great. Can also be used a poultice for natural stone.
http://www.integrity-tile-and-grout-cleaning.com/homemade-grout-cleaners.html
Recipe's for Homemade Grout Cleaners
Recipe #1
3 cups of baking soda
1 cup of water
Or 3 parts baking soda to 1 part water, amount depends area to be cleaned
Mix the baking soda into a paste and apply to the dirty grout. Let it dwell for 10 minutes and rinse clean.
Recipe #2
This recipe uses vinegar, which is acidic, and should not be used on marble, limestone or travertine tile.1/4 cup salt
1/4 cup baking soda
1/4 cup vinegar
Mix the ingredients together in a small container and apply for cleaning floor grout. Let the solution dwell for 20 minutes. Make sure not to let the solution dry out. The solution can be scrubbed it's dwelled.
Rinse thoroughly with warm water.
Recipe #3
1/2 cup baking soda
1/3 cup ammonia
1/4 cup white vinegar
Mix the ingredients and apply the solution to your dirty grout. Let it dwell up to 20 minutes and then scrub. This solution is a bit stronger and should clean tough grout stains.
Recipe #4
Recipe #4 is for light colored or white grout lines only because it has bleach in the ingredients.1/4 cup bleach
3/4 cup baking soda
Mix the ingredients and apply the solution to the dirty grout lines. Add water if you want do dilute the bleach.
Also, the longer you let the solution dwell, the more it will bleach the grout lines. If used on colored grout, the grout lines will start to have a faded appearance.
This is one tile and grout cleaning method (dwell) I've seen a million times when cleaning grout profesionally that really works.
Recipe #5
When brewing up homemade grout cleaners why not go with truly natural products like recipe #5. It's acidic so don't use on marble limestone or travertine tile.lemons
baking soda
Mixing lemon juice and baking soda into a paste and appling to the dirty grout will also work. Let dwell, scrub and rinse with warm water.
Recipe #6
For cleaning mildew off grout use recipe #6. Not for colored grouts. Careful with marble, limestone and travertine and test first in an inconspicuous area.1/4 cup bleach
1/4 cup alcohol
1 cup water
Mix solution and apply to grout with mildew. Keep area saturated and let dwell 20-30 minutes. The bleach will kill the mildew and the alcohol will disenfect the area. Scrub and rinse with soap and water.
Re-apply when mildew returns. In under-ventilated areas, this may need to be done a few times a month.
Recipe #7
3 parts baking soda
1 part Hydrogen Peroxide
Mix hydrogen peroxide and baking soda into a paste and apply to dirty grout lines.
Let dwell, scrub and rinse with warm water. This mixture works great. Can also be used a poultice for natural stone.
http://www.integrity-tile-and-grout-cleaning.com/homemade-grout-cleaners.html
Monday, November 7, 2011
How To Fix Broken Eyeshadow, Like New!
I wanted to share this with everyone since I found it a couple months ago. A huge game changer and money saver!
http://petitelefant.com/how-to-repair-a-shattered-eyeshadow/
http://petitelefant.com/how-to-repair-a-shattered-eyeshadow/
Friday, November 4, 2011
Homemade Frosting, WAY Cheaper
I have a confession... I don't buy frosting due to the price and how gritty the sugar is in them. I make cinnamon rolls, sweet bread, cakes/cupcakes, BUT I put my own frosting on them. People will ask me every time for my recipe, so here it is my friends.
Ingredients:
Ingredients:
2 cups sifted confectioners' sugar
1/2 cup room temp/ softened butter
1 teaspoon vanilla extract
1 1/2- 2 tablespoons milk
In a bowl or mixer put the confectioners' sugar first, then mix in butter, then add the milk. Once you have the mixture thoroughly mixed then add the vanilla extract.
Side note: If it is a little too sweet add the extra 1/2 tablespoon of milk.
Enjoy
Thursday, November 3, 2011
What a Great Gift and A YUMMY One, Too.
Cinnamon Honey Butter Recipe
yields 3 half pint jarsIngredients:
1 cup Honey
1 cup butter, softened
1 cup powdered sugar
2 tsp cinnamon
3 half pint canning jars

- Combine all ingredients in bowl. Using whisk attachment on mixer blend until smooth and creamy, scraping down sides of bowl as needed.
- Use rubber spatula to pour mixture in to a large pastry bag (or Ziploc® bag), cut off tip and squeeze into half pint jars. (tip: place bag in tall glass for support, or have someone hold the bag while you pour)
- Keep refrigerated. Serve room temperature
- Credit: http://tidymom.net/2010/cinnamon-honey-butter-gifts-in-a-jar/
Christmas Cards
Cards are so expensive anymore, and they seem to be a waste of money... most of the time. So, this Christmas I will be using the kids stored up energy to make our cards. I will post a picture that I found on Pinterest.
Purchase card stock and cut in half and that will give you two cards per piece of paper :) If you prefer to send postcards, cut them in fours and decorate each side. Make some homemade finger paint (recipe below) to decorate them with. Cheap, fun, and easy!


Purchase card stock and cut in half and that will give you two cards per piece of paper :) If you prefer to send postcards, cut them in fours and decorate each side. Make some homemade finger paint (recipe below) to decorate them with. Cheap, fun, and easy!
Wednesday, November 2, 2011
Loanable items = $$$$
I saw this website and thought it was worth letting my friends know. We all typically have so much stuff laying around that could make us money. What better time to make some extra money? Go check it out and see what you think.....
http://www.loanables.com/
http://www.loanables.com/
Homemade Italian Sodas
So, my story goes....over the weekend with my parents I began to feel bad. I went in search of something to drink that sounded good. My mother had bought a Central Market grapefruit Italian soda. This sounded excellent to me so I opened it. Man! it was so good. In fear that I would finish off her beverage, I asked her what she thought was in it. She figured we could buy some Ruby Red grapefruit juice and some club soda and we would have it. Well my friends, she was right! The possibilities are endless and what a great way to water down juices for little ones who tend to drink too many of them. Also, it is like they are drinking a soda BUT it is not! Wow a win/win! :)
I filled a juice glass or small glass with about half crushed ice, then poured half full with grapefruit juice, and finally topped off with the club soda. Give it a stir and Voila!
Try using other juices like apple, grape, any fusion juices, or more. Like I said the possibilities are endless.
Enjoy!
Once again, sorry for the break.
I had an opportunity to go out of town and jumped on it :) I wasn't able to post to the blog while I was gone, and apologize. Everywhere I went while gone, people were telling me how much they love the blog. Well, here is my response....
Keep enjoying, because it is here to stay :)
Thank you to all the "likers" and keep checking the blog out.
Keep enjoying, because it is here to stay :)
Thank you to all the "likers" and keep checking the blog out.
Homemade Liquors, Great Christmas Gifts
What an awesome gift! or really just for yourself :)
Coffee Liqueur
1 (2 ounce) jar instant espresso coffee powder
3 1/2 cups white sugar
2 cups boiling water
1 pint vodka
1 whole vanilla bean
Mix coffee and sugar. Add boiling water and stir until dissolved. Cool.
Add Vodka and pour into two 26 ounce empty bottles. Split vanilla into 4 pieces and add to bottles.
Close bottles tightly and keep in a cool dark place for one month.
Fall Spice Cordial
1/2 cup light brown sugar
1/2 cup white sugar
2 1/4 cups apple juice
1 tsp real vanilla extract
1 tsp ground cinnamon
1/2 tsp ground ginger
1/2 tsp ground nutmeg
1/4 tsp ground cloves
1/2 tsp ground allspice
1/2 tsp dried, chopped orange peel
1 cup white brandy
1/2 cup 100 proof vodka
Bring brown sugar, white sugar and apple juice to a boil over medium-high heat. Add cinnamon, ginger, nutmeg, cloves, allspice and orange peel. Boil for 4 minutes and remove from heat. Let stand until just warm. Transfer to a clean 1 qt aging vessel. Add vanilla, brandy and vodka. Cover tightly and let stand for 1-4 weeks. Filter out solids before bottling.
Almond Liqueur (like Amaretto)
1 cup water
1 cup white sugar
1/2 cup brown sugar
2 cups vodka
2 tablespoons almond extract
2 teaspoons vanilla extract
Combine water and sugars in a saucepan over medium heat. Heat until the mixture is boiling, and all of the sugar is dissolved. Remove the pan from the heat and let the mixture cool for 10 minutes.
Stir vodka, almond extract and vanilla extract into the mixture. Store in a sealed bottle.
Thursday, October 27, 2011
Homemade Butter, Extremely Easy
My grandmothers always talked about the best butter in the world ,and how much they missed it. They talked about churning butter and tasting the sweet cream when finished. I got curious as to how simple it could be with modern equipment, and WOW was I surprised! It is incredibly easy. Just take a look....
Ingredients
- 2 cups heavy cream
- 1/4 teaspoon salt (optional)
Directions
- Pour cream into a food processor or blender. Process for 10 minutes, or until the butter separates. Strain off the liquid. Season to taste with salt if you like. Press butter into a small bowl with the back of a spoon to further remove liquid.
Wednesday, October 26, 2011
Homemade Root Beer, Ummmmm Yummy..My Favorite
I wish I knew how to do this, but I don't. So, I am taking this gentleman's word for it. He certainly sounds like he has brewed a many pot of root beer and other items as well. Check this link out for step by step directions. I am not even going to attempt to repost here, but check out his diy on root beer. It sounds fantastic! Sounds like something fun to do with the kids, too!
http://www.americastestkitchenfeed.com/do-it-yourself/2011/07/how-to-make-root-beer/
http://www.americastestkitchenfeed.com/do-it-yourself/2011/07/how-to-make-root-beer/
Tuesday, October 25, 2011
Halloween and Candy, Candy at Home
Do you love Tootsie Rolls? Do you need a Halloween treat for a party? Well, here is a blogger who has given a diy recipe for Tootsie Rolls. Enjoy!
The ingredients are basic:
The ingredients are basic:
6 T Baking cocoa
1 tsp. Vanilla
3/4 c. Powdered Milk
2 T Butter
3 cups Powdered Sugar (divided)
1/2 c. Corn Syrup
Cooking Spray
In a sauce pan (on med) heat butter, cocoa, and corn syrup until smooth and melted.
Stir in the powdered milk and the vanilla extract.
Stir in the powdered milk and the vanilla extract.
Remove from heat.
Add a cup of the powdered sugar and stir until it is incorporated. Once that sugar is mixed in, add a second cup of powdered sugar and stir to mix. At this point the dough will start getting stiff and it might be difficult to stir more powdered sugar into the candy.
Dust your work surface with powdered sugar (using the remaining cup of powdered sugar. 1/2 cup at a time), and knead the candy until it is smooth. If it is still very soft, knead in more powdered sugar until it is firm but not dry or crumbly.
The dough might be a little sticky, but it dries as you work with it so I just sprayed my hands with a little cooking spray to keep the dough from sticking and I didn't have any issues.
Once the Tootsie Roll candy is smooth and a perfect firm, break off a small piece and roll it into a long, thin rope. Using a sharp knife, cut it into small pieces and place them on a wax paper-lined baking sheet. Repeat until you have formed all of the Tootsie Roll dough into small pieces. We ended up with over 75 pieces.
Refrigerate the tray of Tootsie Rolls until they firm up, for about 1 hour. Wrap Tootsie Rolls in waxed paper to keep them from sticking to each other. They will keep in an airtight container in the refrigerator for up to 2 weeks. I like them cold, but you can bring them to room temperature before serving.
Need pictures or see these directions with pictures go to her blog at: http://brandyscrafts.blogspot.com/2011/10/homemade-tootsie-rolls.html
Monday, October 24, 2011
Plant a Tree or Two, Fruit Trees.
I love fruit trees! I also think that what better tree to plant than one that gives back to you and your family, right? We have two apple trees and one pear tree planted. They are still very young trees, but I can't wait to pick apples and pears with my little ones. I remember how fun this use to be, and I want to share this with them.
It is the time of year to plant trees, fall time. So, get out there and go find a nursery and buy a couple fruit trees.
Now, if you want to save even more and not buy the trees. Plant an apple seed in a pot indoors and let it start to sprout over the winter and plant it early spring. The only trick to planting in spring and having to endure the summer is, that you must water the tree properly and keep critters away from the roots. Squirrels will dig up seedlings and eat the nut part, so be on guard :)
Do the environment a favor and plant a tree, do your family a favor... make it a fruit tree, and enjoy the family time of gathering and cooking with the fruit from your tree.
Enjoy!
Sorry for the delay....
We have had a lot going on the past several days, but Doing More At Home is rocking again. Stay tuned!
Thursday, October 20, 2011
Skeptical of Deodorant?
Ok I have to admit, I am skeptical of deodorant, and all the things in it. I do believe that our bodies are meant to sweat, but I definitely do not want to stink! lol
There are all sorts of homemade deodorants out there, but I believe I have the most simple one of all.. simple baking soda straight out of the box.
I take a powder brush and just drop it in the top of a box of baking soda, bang it against the sides of the box to get the excess off, and then I powder it on under my armpits. It definitely doesn't allow me to smell :) Now, if there is an event or a day planned that requires me to not sweat, then I will use a deodorant stick :)
Tip....lesson learned rather, don't look at your armpit while dusting the baking soda on, you might get it in your eyes.
I hope this helps, and as always....Enjoy!
Wednesday, October 19, 2011
Scented Pine Cones, Oh So Yummy Smelling.
I took the 6 year old out picking up pine cones while the younger one napped. She had so much fun finding and gathering the pine cones from the yard. She knew we were doing a craft, but she didn't care she was having fun. These will be some Christmas gifts this year for some of our neighbors and friends. These are perfect for putting in a decorative bowl or throw one or two in the fireplace while it is burning to release a nice cinnamon scent. Are you ready?
I brought them in, washed them off, and laid them out onto a baking/cookie sheet covered in foil ( make sure to put a layer of foil down prior to using baking/cookie sheet because of sap). I then preheated the oven to 200 degrees and popped the cookie sheet in with the pine cones laid out flat. Heat the pine cones until they pop open. The heating also ensures that any insects are killed and any sap is heated off. Once the pine cones have popped open feel free to remove one by one from the oven if others have not opened up. Allow the pine cones to cool down. Then, grab a plastic baggy and put the cool pine cones in it. Then add several drops of cinnamon essential oil and shake around and allow pine cones to sit 7 days in the plastic baggy to absorb the essential oil. If you are doing lots of pine cones you will probably have several plastic bags filled with pine cones.
Put these pine cones in a decorative bag with a pretty tag for gifts. If you can find some mesh bags they would be the ideal bag, but very hard to find. I put a paper bag through the printer and print on it. Then I fill the bag with the pine cones to give away.
There you have it! Enjoy!
Tuesday, October 18, 2011
Homemade Potato Chips, All Flavors
Homemade potato chips are the best, no denying! and it is sooooo easy. I am going to give just one way to make these, the way I make these, but there are so many other methods. Feel free to search for the perfect method or recipe you choose.
Ingredients:
Potatoes (I use plain ole Idaho potatoes)
coconut oil (other oils are ok, I choose coconut for its health benefits- make sure if you use another oil you put the fryer to the appropriate temperature so that you don't start to burn the oil)
sea salt
Directions:
Heat up your Fry Daddy or any deep fryer with your coconut oil. Put the temp just below 350 degrees (if you do not have a fryer then use a deep pot and a candy thermometer to achieve the same thing)
Slice your potatoes thin (I slice mine through a mandolin-it gives the exact slice I need).
Make sure you do not put your potatoes in water! Once you slice them, and the oil is at the temperature, drop them into the fryer, but don't drop too many. You want them to have room to move around and not stick to each other.
Cook approximately 3 minutes or until golden brown.
Pull out of fryer and lay on several layers of paper towel and sprinkle sea salt on chips.
Allow to cool.
Now for different flavors use any of these ideas:
Popcorn sprinkles (nacho cheese, jalapeno, etc)
Ranch dressing (the dry mix packets)
Cracked pepper
French Onion (the dry mix packet)
The sky is the limit!
Enjoy!
Monday, October 17, 2011
Indoor Garden Tip and Idea
I saw a tip for a indoor garden idea that I really thought was great. If you use green onions in salads, meals, served with Thanksgiving dinner, and so on ....you will really want to check this out.
The details on how to do this weren't there so I will be typing what I read through the lines :) Take a box of some sort, I am thinking like a shoe box or something even more shallow and line it with a barrier such as plastic shopping bag. I suppose I will be double or tripling up my bags just to be safe from any leaks. Then fill the box with some good soil, not all the way to the top but maybe half way or a tad more. Then buy some onions at the grocery store like you normally would, cut the end off that has the roots and lightly plant the root end and cover with dirt. Do not bury deep maybe just enough to barely cover the top of the cut end with dirt. Make sure you plant root down :)
Now! Here is what is so cool! Each time you pull some fully grown out to use in a recipe, you cut the end off and replant it! It is an endless supply of green onions replenishing itself. Awesome huh? I will try to post some pictures of mine once I get it started.
Enjoy!
Saturday, October 15, 2011
Homemade Apple Cider, YUM!
I was in the grocery store and noticed one of my favorite things making its way to the shelves. I love this time of year for all my little favorite things. I couldn't help but notice that there weren't many refrigerated ones, which I think taste the best, and only ones out on a shelf. Something about the ones that are kept preserved/warm on a shelf, seem to taste so carbonated to me. So, here I went to find a recipe to....what?...yes, do at home :)
Enjoy!
Enjoy!
Ingredients
- 8 -10 apples ( I used gala for a less tart or intense taste)
- 1/2-1 cup sugar
- 4 tablespoons cinnamon ( or 4 cinnamon sticks)
- 4 tablespoons allspice
Directions
- Quarter your apples (no need to remove peel or seeds).
- In a large stock pot add your apples and fill with water--just enough to cover the apples.
- Add your sugar.
- Wrap your cinnamon and allspice in a doubled up cheese cloth and tie, and add this to the apples and water.
- Boil on high for one hour (uncovered) checking on it frequently.
- Turn down heat and let simmer for two hours (covered).
- Take off the heat after two hours of simmering and let cool.
- Remove spices and mash up the apples to a pulp like consistency (a potato masher works well for this).
- Once cool pour into a strainer over a large bowl. When most of the juice has drained away, put the remainder of the pulp into a doubled up cheese cloth and squeeze over the bowl until no more juice comes out.
- (At this point you can either restrain the juice to get out the little bits of pulp that remain with a cheese cloth draped inside the strainer to catch them or just leave it like I do).
- You can store in an air tight container in your refrigerator for up to a week or you can freeze it for later use if you like.
Eye Makeup Remover
Ok, I have heard this, but never tried it....not sure why, silly huh? Here is a super easy eye makeup remover you can do at home.
Mix together:
1 Cup of water
1 1/2 TBSP of Tear free baby shampoo
1/8 tsp of olive oil (if you are worried about oil around the eyes, consult a physician or feel free to eliminate this ingredient)
Store in sterile container.
Super easy and extremely cost effective! Gotta love it!
Enjoy!
Mix together:
1 Cup of water
1 1/2 TBSP of Tear free baby shampoo
1/8 tsp of olive oil (if you are worried about oil around the eyes, consult a physician or feel free to eliminate this ingredient)
Store in sterile container.
Super easy and extremely cost effective! Gotta love it!
Enjoy!
Friday, October 14, 2011
Clementines Are Not Just For Eating...
Clementines are becoming a rather popular item in store bought skin care items. In Whole Living, November 2011, issue they have published a clementine face and body mask. The citric acid will act like a chemical peel and sluff off the old layer of skin to reveal a healthier skin. They also note that it is an anti-inflammatory and a blemish fighter....SCORE!
So, instead of paying for these store bought brands, Mor Neroli or Skinnyskinny, make your own on the cheap :)
Ingredients:
1 Clementine
1/2 cup Ground rolled oats
3 Tbsp. of raw honey
2 tsp. of Jojoba oil
Instructions:
Peel the clementine and dispose of peel. Puree the fruit of the clementine. Put the clementine puree into a bowl and add the ground rolled oats, honey and oil. Mix together thoroughly (if you prefer a thinner variety you can add a little water) and apply to face and leave for 10 minutes. Rinse with warm water and pat dry with towel. You can use this mask once a week. Any unused portion can be stored in an air tight container for up to 2 weeks in the refrigerator.
Thursday, October 13, 2011
Doing More At Home Moment..
Recently I needed to switch out the children's closets and get the outgrown items out and new in. I had a mess in each child's room and was quickly becoming overwhelmed. So, I decided to help the child see her numbers, recognize the number, and follow directions (what kid doesn't need help with that lol). I placed the numbers from a number placement puzzle on the floor in a line. I then would tell her the size of the piece of clothing and have her pile it behind the appropriate number. I also had a pile for donations pile, box up items pile, and pass along pile. I just gave those piles other numbers such as 0 or the even numbers which children's clothes don't use. She had fun, and it helped me out a ton! She even volunteered to help me with her little brothers closet which was fantastic.
So, I suppose the moral to this DMAH moment is to incorporate your kids in helping you clean. They will be with you, they have pride in helping, incorporate learning where you can, and the time to converse with your child.
So, I suppose the moral to this DMAH moment is to incorporate your kids in helping you clean. They will be with you, they have pride in helping, incorporate learning where you can, and the time to converse with your child.
Wednesday, October 12, 2011
Leftover Magazines...And So Many Of Them.
There are so many things you can do with leftover magazines, so I thought I would give a couple good uses.
1.) Deliver them to a retirement community, nursing home, or an elderly neighbor.
2.) Cut letters out (alphabet) and Modge Podge onto pieces of square wood and place a magnet on the back to use as your fridge learning center.
3.) Use the pretty backgrounds for pages for photo albums or memory books.
4.) Recycle them, please don't throw them away :)
5.) Cut groups of things out to make a learning book, such as a farm animal book, alphabet book, numbers book, things around the house(phones, doors, chairs, tv, etc), foods, and so much more.
6.) You can make cut out dolls with cut out clothes options for little girls.
7.) Use objects from magazines to allow kids to glue images on paper to make a picture of a scene or collage of things they like.
As you can see the options are endless, and you can really get creative with this.
Feel free to add comments below of ideas you can think of or have done. We would love to see other activities out there with old magazines.
DIY Storm Shelters
This is a very ambitious DIY project, but I feel it to be necessary to share. With the storms from this past year and the devastating effects of them, I felt it necessary to share the FEMA site that gives you the option to build a storm shelter yourself.
If anything, print these building plans out for different types of places for a safe room. I hope that you can utilize this site and hopefully it will save a life.
Enjoy!
http://www.fema.gov/plan/prevent/saferoom/shplans/
If anything, print these building plans out for different types of places for a safe room. I hope that you can utilize this site and hopefully it will save a life.
Enjoy!
http://www.fema.gov/plan/prevent/saferoom/shplans/
Tuesday, October 11, 2011
Easy Breezy Week of Planned Meals
I read an organizational tip that I believe to be a WONDERFUL idea since the inevitable question gets asked and answered the exact same way...."What do y'all want to eat tonight," and the answer, "I don't know."
The idea was to get 7 baskets and label them Sunday through Saturday. Take the ingredients and recipe/book and put it in the basket. Do all 7 of them at the beginning of your week and you won't have to ask the redundant question that yields the same useless answer. Also, this helps you to keep your grocery list trimmed and you will not waste any food since you are using it all during that week. If you are running late to cook, the family (if willing) can easily get the recipe and follow the directions to get the meal started for you.
I found some clear Steralite containers at Target for $1 and just put note cards in them with the day written on them. Stack them in your pantry and voila....hassle free food planning the night of.
Enjoy!
Monday, October 10, 2011
Do It Yourself Vanilla Extract
So many recipes at this time of year call for vanilla extract, and it can be expensive if you don't get imitation. To lessen the costs, here is a do-at-home vanilla extract.
Ingredients and Materials:
4 oz. Mason jars (use how every many you need for use at home or gifts)
3 vanilla beans per jar
Vodka (buy a good variety to use with this, no cheap ones)
Directions:
Slice the beans down the center, but not in two. You just want them slit down the middle to release their flavor to the vodka. Place the beans in your jar and then fill with Vodka. Do not fill to the top, leave plenty of room in the mouth of the jar (typical canning style). Seal with lid and store in a dark, cool place. Once a week give the jars a turn to mix thoroughly again. Extract will be ready to use in approximately 8 weeks.
Note: If you plan to do any of these for Christmas gifts you better get to making it :) 8 weeks will put you into December.
Enjoy!
Fall Time Brings Ooodles of Great Flavors
One of my most favorite things about fall is the flavors of foods and items that come out in the stores. My favorite, of course, is pumpkin spice creamer....YUM!
I happened to turn the bottle around to look at it and saw lots of things I couldn't even pronounce lol. I suppose these days I am trying to keep our diets as chemical free as I possibly can. So many reports keep surfacing about certain additives, preservatives, colors, etc that are not proving to be so healthy for us. I love my family so very much and I want to do what I can to keep them safe and healthy.
Now that I have looked at protecting my family as much as I can, I realize so much of the time I don't do the same for myself. Why is this? The mother curse, I have been told, that makes you put your family first and it puts yours needs last. So, I have found one to replace as a healthy thing for me since I have my coffee every morning, who doesn't right? :)
Ok so here it is, Pumpkin Spice Coffee Creamer, to store this in I use an old creamer bottle.
Ingredients:
1 cup of heavy whipping cream
1 cup of whole milk (or if you choose to lessen the fat content of milk use 2%)
3 tablespoons of pumpkin puree (you can use canned but look to find a more organic option)
1 teaspoon of pumpkin spice
1 teaspoon of vanilla extract (I will post a do it yourself vanilla extract after this post)
4 tablespoons of maple syrup
Directions:
Whisk together the cream, milk, pumpkin, pumpkin spice, and maple syrup in a saucepan over medium to medium low heat. Continue to stir to prevent any sticking to pan. Remove from heat when mixture begins to steam. At this point add the vanilla extract and continue to stir until thoroughly mixed together. You will want to strain your mixture through a strainer prior to placing in your creamer container. Once, all liquid is in container, refrigerate.
NOW..... on the outside of the creamer bottle put the date that comes first from your milk or creamer. This will be when you need to throw out the creamer. Tip... buy organic milk and creamer as they seem to be stocked up more at the stores and have a expiration date that is much further out than regular milk.
Enjoy the weather and your warm cup of coffee.
modified recipe from deliciously organic
Saturday, October 8, 2011
Have you heard of Crock Pot Apple Sauce?
Such a very healthy snack, cooking additive, desert starter, muffin stuffer, and so much more..... I saw a crock pot recipe for Apple Sauce and thought what a saver of money for the kiddos lunches. Either pack a little for the kids or store it for recipes and more.
We have an apple orchard here locally that is family owned. It would be a great time to take the kids and allow them to pick the apples to bring home. For kids old enough, allow them to help you pour in the ingredients into the crock pot. They will feel they contributed to their snack that they will be eating at school and home. A great way to start kids learning about doing more things at home :)
Ingredients:
4 lbs tart apples, cored and sliced thin
1/2 cup sugar
1/2 teaspoon cinnamon
1 cup water
1 tablespoon lemon juice
Directions:
Put apples into crock pot and pour ingredients over the apples and stir. Cook on high for 3 hours or low for 6 hours.
Subscribe to:
Posts (Atom)